
Check out the new and improved version here!
Have you ever wanted to make your own survival food bars? Like the survival food bars the stores sell, but homemade survival bars so you know what’s in them. Well, I got together with a few friends to make some homemade survival food bars and here’s how it turned out. Make sure to read through the comments when you’re done for some suggestions on making them better!
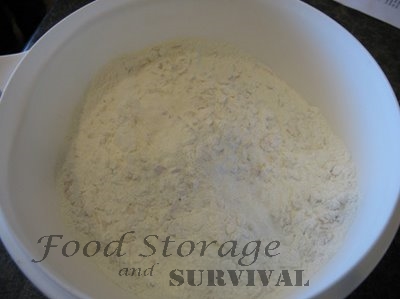
Mix the oats, powdered milk, and sugar together in a bowl: A couple of us used regular oats, a couple used quick oats. I really don’t think it matters which you use–whatever you have on hand is fine.
In a medium pan mix water, jello and honey. Bring to a boil. This is just the 3 TB water called for, not the cup of water you’d usually use when making jello. We found that a rolling boil was better than just beginning to boil for the mixing step. The recipe I had specifically called for lemon or orange jello, but we didn’t know why that would be, so we made some with raspberry and watermelon jello also. After we tasted them, we figured the lemon or orange were specified due to the high amount of sugar in this recipe! The loaves made with sweet jello flavors were REALLY sweet when they were done!
One of us also mis-read the instructions and mixed her jello in with the dry ingredients, so we just boiled water and honey at this step and it gave the final product a slightly different texture, but still worked.
Lemon jello barely boiling:

Raspberry jello at a rolling boil:

Add jello mixture to dry ingredients. Mix well. If the dough is too dry, add a small amount of water a teaspoon at a time. This is where it got a bit tricky. You want this to be dry, but it has to be moist enough to stick together, and this stuff is stiff!!! Spoons only work for about 30 seconds–you’ll end up cleaning your hands and smashing it all together manually. It’s possible this would mix together with a mixer instead but be careful about burning up your motor. We didn’t even think to try using a mixer–guess we wanted to work those arm muscles!
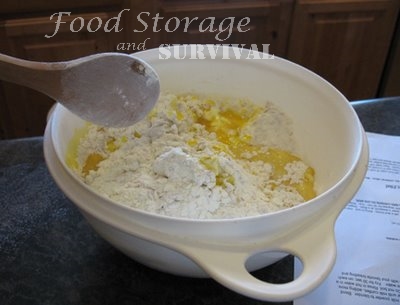
Add the water a little at a time–do NOT get impatient and just add a bunch of water! You’ll be able to stick it together lots easier, but the idea is for it to be dry so the loaf will not mold in your car trunk like your kid’s leftover tunafish sandwich . . .

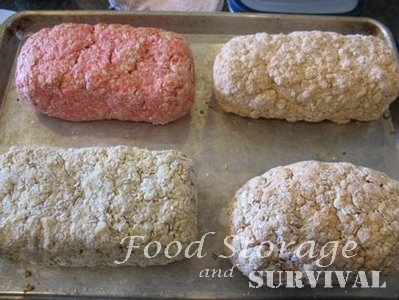
Shape dough into a loaf about the size of a brick. Yeah, right. We had a couple of Martha Stewarts with us that were able to form lovely brick shaped loaves, I just wasn’t one of them. I don’t think it really matters what shape your loaf is–it’s not like you’ll be posting pictures of it on the internet or anything . . . I’m thinking if I do these again I’m going to make smaller loaves anyway and just have 3 smaller loaves instead of one big loaf. I’m going to need a chisel to be able to eat any of this! (Check the comments section below for some good suggestions for shaping and cooking the loaves.)

Place on a cookie sheet and bake at 350 degrees for 20 minutes. Another recipe I found says to put it in the oven and dry at low heat. That might be better overall. Our loaves got a bit brown on the bottom and we had severe stickage to the pan (think melting/cooking jello+sugar), so you might spray your pan first or use parchment paper on the pan. Here’s the loaves after they cooked. Okay, I know, they look just like the loaves before they cooked, but really, I didn’t just go to the other side of the pan and take a picture, these were the cooked loaves.
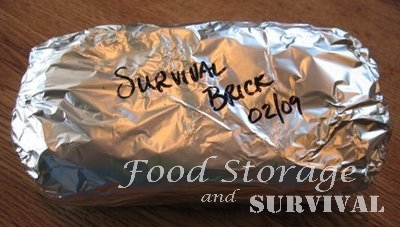
Cool. Wrap in aluminum foil to store. I do not know why you wouldn’t put it in a ziplock or something, but I guess maybe it stays more dry in the foil. Not sure about you all in humid climates–this probably wouldn’t last in foil–I think I’d maybe make sure it was really dry, then vacuum pack it with my foodsaver if I lived anywhere besides the desert!
“This bread will keep indefinitely and each loaf is the daily nutrients for one adult (approx 2000 calories).” This is what the paper says. I haven’t tested it. My loaves are going in the back of my suburban when I get my car kit put together and we’ll see how long they last! This was not too difficult to make. I figured the cost of 1/4 of a #10 can of powdered milk at $2.00 (we got the powdered milk at $8/can–lots of places are more expensive than that) the jello at $ .50 (okay, mine was $.97 because I had to buy it at the little store here in town), the sugar, honey, and oats another $1.00 or so. So on the cheap end, these cost $3.50ish for 2000 calories, compared to $4.95 for 2400 calories of the commercial emergency food bars. These are larger and heavier than the commercial bars also so they’ll take up more room in your pack, but also probably be more filling. I will say however, that the orange jello brick (my personal favorite) actually tasted pretty good and not all processed and shorteningy (yep, a real word).
So there you have it. Making your own survival food bars from the goods in your food storage! And if you don’t want to eat it you could always use it as a doorstop! :)
Check them out over a year later in this post. And more than 2 years old in this post.
Edited to add: I have updated this recipe to fix a lot of the problems with it! Especially the problem of being such a difficult shape to eat! Find the improved recipe here.
Keep preparing! Angela
***************************************************************
Subscribe to my email newsletter for updates and special deals.
Please be sure to follow Food Storage and Survival on Facebook which is updated every time there is a new article. You can also find me on Pinterest, and purchase my book, Food Storage for Self Sufficiency and Survival on Amazon.
***************************************************************
Shop the Thrive Monthly Specials or my favorites, the freeze dried vegetables and yogurt bites!
***************************************************************
 Copyright secured by Digiprove © 2013 Angela

You mentioned making three smaller bars instead of one big loaf – are the loaves cuttable (and is cuttable even a word)? But really, how difficult will it be to divide it amongst ourselves? :)
Unless you can keep them semi moist DO NOT make loafs, unless you carry a hammer and chisel, they get really hard after while! I make them look like PopTarts.
Just found this site, looks good, I will be making some. As for dividing your loaves, try what I do to make venison sausage:
Before baking, pack the mixed ingrediances into a 8″ lg PVC pipe. Plunge it out onto a tray (I use a cover from a Pam spray can,which fits the ID of my PVC pipe).
Bake.
After baking, I would use my meat bandsaw to slice 3/8 to 1/2 thick.
Dyhiderate over night.
Now you can stack them back together and vacuum seal.
The one big advantage of the loaf would be to store it under your FRONT seat and use it to defend yourself.
FYI….would added dryed fruit be good in these bars?
Sorry I missed the fun! Thanks for making my loaf for me, it’s a great doorstopper…;) Just teasing! See you later!
Becky–they are pretty difficult to cut. Keep in mind mine is still fresh also–it’s only going to get harder the longer it stores. I ended up breaking it by “bending” it over the edge of the counter after I cut into it about 1/2 inch with a steak knife. It’s not going to “slice” like bread, or break in nice even pieces. You could probably hatchet it into chunks pretty easy. :)
I was curious if the whole bar was 2.5k calories or if it was by the slice? Nice recipe tho I will have to make a batch or two.
Farmer–the calorie count is for the whole loaf. Thanks for asking!
This loaf would be more filling than the commercial ones also.
Angela! This is the recipe we used! I had lost it but do remember they looked exactly like that and had the flavored jello and…I’m soooo exited! Can you tell?! Yes! Yes! Yes! Thank you!!
Tess–these are way easier than the sprouted wheat bread! But I’m going to get that one eventually . . .
Ok, they look like brinks, and you say they don’t cut well, HOW do you eat them?
Then, baking…could you use a dehydrator?
So many questions, so little time…
Jeannetta–They don’t cut well, but do kind of break apart since they are stuck together so dry, so I guess you’d just have to break them with something to get an eatable size chunk.
In my unscientific opinion, a dehydrator would be fantastic! Kind of smash it flat–maybe cookie shaped–and put in on the trays and dry it. Would already be in eatable chunks that way. It would take more room to store, but I may try that next time! You sure wouldn’t scorch the bottom of the loaf that way . . .
That was very fun and interesting. I am sure glad my hubby got a mal for Christmas this year so we will be able to eat ours. ;)
On edibility – I’d have to refer to our 18th c. reenacting and what was “biscuit” or “ship’s biscuit” in that era (became “hardtack” later). In that day it was uniformly broken up (NOT easy) or dropped whole into broth, tea, stewpot, water if only that available to soften – That stuff WILL break teeth! Haven’t tried this one yet though; so far, just surfing for reference purposes.
Just what I was thinking, aardvark. I was taught to cut it up, as soon as pulling it out of oven, into servings. Not sure about this recipe and how to do that. Will have to experiment. I make something like this though I use much less sweeteners. I also make a savory one for soups etc. YES, this is where dunking became a custom. I will try this but will cut the sweetness a lot. This works great for camping, nothing like a cup of hot chocolate with some sweet hardtack floating and softening :) or a cup of soup with a savory serving softening while floating. :)
Anyone tried making pemmican for long term storage?
what if you sorta presegmented it before baking – maybe press a knife into it an inch or two before baking
might be the best thing since
.
.
.
.
.
.
.
.
.
sliced bread!
Ahhh, presegmenting the loaf would be a great idea. It might work–it's hard as soon as it's put together, but even harder after it bakes. A good sharp knife could probably make decent scores in the loaf before baking it. The only problem would be if the loaf decided to crumble apart instead of slicing. You'd have to experiment with that, but in theory it should work!
mixed as per instructions and ended up with a runny mess…added lots more milk, sugar and oats to male a stiffer dough. Question! does one add the one-cup cold water as per instructions on Jello Package???
Made four in bread demi-loave pans and pressed several with hamburger press to make "cookies"
Waiting on oven to see results
Anon–don't add the 1 cup of water as directed on the jello package, it's just the jello powder, 3 TB water and 3 TB honey in the pot.
Sounds like you made it work–how did they turn out?
Made something like these years ago but lost the recipe. We formed them into granola bar sized pieces and baked them. I don't remember how long or at what temperature. The dehydrator sounds like a great idea. I may make up a batch to take along on our trip. Moving 3700 miles in the middle of winter from Alaska to Indiana with 3 kids (2 of which are teenagers), 2 adults, and 2 dogs (14 lbs and 95 lbs.) Remember us! Any food we can take along which won't go bad will be a definite boon! plus I have tons of jello!
What about shaping them into smaller bite-sized balls or cookies?
Yes, shaping them in smaller pieces would work very well. They probably wouldn't have to cook as long that way either.
Is there something you can substitute for the jello that would be organic to use for flavoring?
I plan to go with stevia and honey rather than the sugar, as stevia will hold up longer and it is much better for the ol' bod, .
Thanks for the great info!!
Gamma Rori
How is stevia going to last longer than something that lasts forever? Just wondering.
Wouldn’t using stevia kind of defeat the purpose of survival bars since a big part of the idea is to get a high caloric count. They’re intended for a totally different purpose than normal, everyday healthy living. Unless, of course, you were intending to use them for a snack now, instead of a survival situation.
Unflavored Gelatine would work and is the same thing as Hide Glue. If you really really wanted to, you could take a hide from a deer and stretch it out in a frame and dry/dehydrate it. Scrape all the junk and hair off, make sure it’s DRUM dry, and cut it into small strips and boil them with water till it starts to thicken. Then you have “jello”.
Ma Tanner
OK, I’m a little late to this party but after reading some of the comments, I just had to make a few observations.
First, I know that you ladies are concerned with your figures but the purpose of these bars is to provide maximum CALORIES in minimum weight/volume to give you the energy you need to get home. There is no concern over protein or vitamins or minerals so do NOT use sugar substitutes or add vitamin supplements or protein powders. You can do just fine without those for a week but you can’t do fine without the calories.
I’ve seen recipes that use essential oils for the flavoring rather than the jello. Vanilla with the coconut oil would make a good tasting bar.
Don’t add fruits or nuts. These shorten shelf life and the nuts can go rancid. Vacuum pack small, one to two ounce packets of trail mix to add to your Get Home and BOB bags. Rotate them out about once a quarter. Ditto dried fruits like banana chips, apple slices, freeze dried strawberries, etc. though they need less frequent rotation. All of this provides tasty comfort food that will cheer you up during the trek. Ditto chewing gum and hard candy (WITH sugar!) – keeps the mouth moist and cheers you up.
This is a bit off the subject but more comfort food is coffee or tea and a hot breakfast. If you can build a small fire to boil water this is easily accomplished (though both can (reluctantly) be done with ambient temperature water – I leave it to you to find out easy ways to build the fire but Youtube.com is a great resource for that information. First, vacuum pack instant coffee or tea bag, sugar and creamer (dry type) in individual servings. Put instant oatmeal, skim milk powder, sugar, cinnamon, raisins (or other dried fruit) in a double zip lock bag eliminating as much air as you can. You’ll need a cup for the coffee of course but you can pour hot water in the zip lock bag and eat it directly from that – don’t forget the spoon. Again, raisins shorten the shelf life so be sure to rotate the oatmeal if you include them.
I hope these comments help.
those look really awful, but I am sure in a survival situation they might just be your favorite sight. Thanks for the recipe.
we used to press these into a pan so that they are about half an inch thick and slice into 6 bars before drying – then wrap in heavy duty foil when dry and wrap in PVC insulation tape makes 6 bars one per meal 3 per day also we used 3 cups oats and raisins for extra taste and calories
i came across your website and was reading the post and the comments on how hard it is to portion these loaves out and i got to thinking… how about a hack saw to cut them…?
Just wanted to correct something you said, “This bread will keep indefinitely and each loaf is the daily nutrients for one adult”. Sorry that can’t be true. Maybe the calories but not all the nutrients, meaning all the minerals and vitamins an adult needs. If things like this really had everything you needed people would be selling these like crazy as diet bars. Just hate to see people over looking a good multivitamin should be added to a long term food plan or at least keep in mind these bars are for short term. and “real” food is needed for survival.
SURVIVAL FOOD BAR
from the NEW ERA, March, 1977, p. 27.
http://lds.org/new-era/1977/03/emergency?lang=eng
and USU Extension booklet.
3 cups rolled oats, barley flakes or wheat flakes
[quick oats are finer if you have a baby]
2 1/2 cups non-fat dry milk
1 cup sugar
3 tablespoons honey
5 tablespoons water
1/2 small package citrus flavored jell-o
Place all the dry ingredients EXCEPT the jell-o in a bowl.
Add the honey to the water and heat to a boil;
Add jell-o to honey water and dissolve.
Add liquid mixture to the dry ingredients and mix well.
Add more water a teaspoon at a time until it can be molded.
Shape into two bars or crumble on cookie sheet for
bite-size eating out of hand.
Each bar will be about the size of a match box and will
be sufficient food for one day.
The bar can be eaten dry or cooked in about 1 pint water.
For indefinite storage bake in oven on low heat-250 degrees. Wrap in heavy duty foil. Store in a covered container in a cool place.
(Source: Booklet from Utah Division of Comprehensive Emergency Management, “72 Hour Emergency Survival Kit – Plus – Food & Water Storage”)
also posted at: http://preparednessnibblesandbits.blogspot.com/2009/02/survival-ration-bar.html
COMMENT: posted to a food-storage group
#2072 From: “Terri J.”
Date: Sat Apr 21, 2007 12:16 pm
Subject: RE: survival bread? n4zud
I have seen a similar recipe but it was called Power Bars, or something similar. I guess meaning to be a substitute for those expensive meal replacement bars?
I ran the recipe through a program that does nutritional analysis and it claims a single loaf will provide a days worth of calories for certain, but much more carbs, calcium, vit C & protein than the RDA standards. It also comes up short in fat, sodium & vitamin A, so just spread some colored, salted butter on it. ;)
-Terry
====================================
Emergency Survival Bar
http://www.waltonfeed.com/grain/cookin/emergbar.html
3 C. cereal (oatmeal, cornmeal, or wheat flakes)
1/4 tsp. salt
3 T. honey
2 1/2 C. powdered milk
1 C. sugar
1/2 C. Jello (optional)
1/4 C. water
add raisins if you like
Place all dry ingredients except Jello in a bowl.
Bring water, honey, and Jello to a boil. Add to
dry ingredients. Mix well. Add water a little at
a time until mixture is just moist enough to mold.
Place in a small square dish and dry in the oven
under very low heat. Wrap and store. This will
make 2 bars, each containing approx. 1000
calories or enough food for one day. These will
store for a long time if they are cooked until quite
dry, and are excellent for emergency packs, etc.
Eat dry, or cooked in about 3/4 C. water.
NOTE: Just for fun, the web page author, Al
Durtschi, ( E-mail: mark@waltonfeed.com )
did a nutritional analysis of the above recipe’s
contents using rolled oats and powdered milk
fortified with vitamin A. He found this to indeed
be a very nutritious bar. One bar contains only
half of the nutrients of the whole recipe and
therefore you may wish to set aside two bars
per day to get the following:
NUTRIENT PERCENT RDA
———————————
Food energy 74%
Protein 135%
Total lipid (fat) 12%
Carbohydrate, by diff. 93%
Total saturated fat 8%
Cholesterol 10%
Sodium 441%
Total dietary fiber 60%
Vitamin A 121%
(If Vit A fortified powdered milk is used.)
Ascorbic acid 16%
Thiamine 154%
Riboflavin 191%
Niacin 16%
Vitamin B6 38%
Folacin 113%
Vitamin B12 114%
Potassium 177%
Calcium 218%
Phosphorus 308%
Magnesium 116%
Iron 80%
Zinc 90%
Pantothenic acid 75%
Copper 55%
Manganese 212%
Linoleic acid (18:2/n6) 122%
Linolenic acid(18:3/n3) 9%
Histidine 234%
Isoleucine 491%
Leucine 615%
Lysine 610%
Methionine+Cystine 396%
Phenylalanine+Tyrosine 630%
Threonine 563%
Tryptophan 503%
Valine 488%
Probably the biggest problem is the low
vitamin C. However, in a pinch, a person could live a
long time off these bars alone. They are also a bit
short in the calorie department, but are excellent
in protein, over half of the B vitamins, and excellent
in the minerals category.
These bars, no doubt, nutritionally beat
many of the expensive bars you can purchase from
the different companies, and properly sealed would
probably last as long.
**Emergency Survival Bar, ”The New Cookin’ With Home
Storage” by Vicki Tate. Copyright 1993 by Peggy Layton and
Vicki Tate. These recipes may be freely used for non-profit
purposes as long as the book source and author remain intact.
When I make these, I’m going to crumble a Vitamin C tablet and add to the dry ingredients.
I think the added vitamin C would be destroyed by the heat. Maybe this would make dehydration a better option.
Have you tried using dried goat milk or something other than powder milk I have a grandson that is allergic to milk ???
Sounds great, but…
Any vegetarian (non-Jello) versions of this knocking about? :)
I have not seen any that don’t use Jello. Pretty sure the Jello is there for flavor as well as to help hold the whole thing together, but maybe just increasing the honey a bit would serve the same purpose and the jello could be excluded from the recipe? Not sure how well that would work, but it might be worth trying.
I made a similar cereal bar for my kids but used molasses instead if jello and they tasted great that might be a decent alternative to the jello but I would also add vitamin c to them
Jello is practically all protein and sugar. I think the flavoring is just a bonus.
You might substitute agar agar for the jello. It’s actually more stable at room temperature when prepared in a gel. http://www.edenfoods.com/store/product_info.php?products_id=108940
You can get it at a Chinese grocery store or online. As for flavoring, you could also purchase flavorings from a vendor. http://www.mccormick.com/Spices-and-Flavors/Extracts-and-Food-Colors/Extracts
What if you divide the brick into 3 that way it can be like one piece per meal. Plus hopefully stretch them out ( my family and I have a food storage collect that is growing so maybe if we did 2 pieces of “brick” and one real meal a day…) I know you stated that the Jello was probably more to bring down the sweetness. I’m not that fond of lemon and orange flavored “cakes” ( don’t get me wrong beggars can’t be choosy ) but is there another flavor you can think of that might do the same?
Maybe eating it with coffee or tea?
It would be good with some kind of warm/hot drink. The citrus flavored jellos were a bit less sweet than the others, so really any flavor jello would work. Lime would be fun to try, but the color might be a bit unappetizing! You could also probably cut back on the sugar a little with the non-citrus jellos although that would take some of the calories out with it.
I made these and I really do like them. I made this in the size of a candy bar and wrapped them in foil.
My question would be if this is so hard that you are talking about hacksaws and hatchets how do you eat it? If you bust your teeth on it you wont be eating much of anything
It is difficult to break a piece off of it, but not impossible. Once you have a bite size piece, it isn’t hard to chew after it gets moistened up in your mouth a bit.
Hi,
I’ve found vegan jelly (same as jello?) in the supermarket near me. Not tried it. Your supermarket might have something similar.
Australian supermarkets = Vitarium Jelly Raspberry.
I know The Cruelty Free Shop online = Plain jelly. They have powdered soy milk too.
The powdered soy + goats milk is at amazon.com too. Soy powder looks more affordable.
If they don’t post to you, amazon looks like it has something similar.
http://www.amazon.com/Jeannie-Prebiotics-Content-Gelatin-free-Strawberry/dp/B0040I3QMW/ref=sr_1_cc_1?s=aps&ie=UTF8&qid=1342429394&sr=1-1-catcorr&keywords=gelatine+free+jelly
Have you tried these to see if they melt in the heat?
They look solid, just checking.
Thanks for the recipe.
From Sarah
Joyce – Sorry, should have mentioned I’ve not actually tried this recipe yet. I only know that you can buy powdered soy or goats milk. Based on the dates, you might have tried it already. Hope it worked well.
Why not just make or buy some really good oatmeal cookies. Other than the little bit of moisture in them I don’t see why they wouldn’t keep. Maybe not as long as something like this but maybe for a while. I buy some oatmeal cookies with fruit and nuts in them.
These are supposed to have a higher nutritional value than a cookie with the powdered milk in it. Also, there are no fats or oils in these survival bars that could go rancid as there would be in a standard cookie recipe. Some nice, dry cookies would keep for a while if they were packaged right. You’d want to rotate fairly often, but that wouldn’t be hard with cookies!
We made these many, many years ago for survival kits but smashed them down into the cookie pan and cut them into granola bar size after cooking. They are great as a snack and often didn’t even make it into the 72 hour kit.
Also, you can make hot oatmeal out of them by just putting them into some hot water. A great thing if you are out in the weather and looking for something hot to eat. Great make ahead camping food!
Ok, just made this recipe, except that it took almost a 1/4 cup of water. I also rolled out to 1/4 inch thick and cut them like cookies and put them in the dehydrator
How about using instant chocolate or vanilla flavored pudding(s) mixes to help flavor the “bar” better? Or even to have an extract to add the flavor component in (such as vanilla or any other flavoring,butterscotch, ect?).Also there is another type of recipe that uses reg. flour,veg. shortening, cornstarch,sugar,honey,and van. extract in (but I already have several other ideas about ingredient substitutions and additions on this particular recipe). Well, this is just a few ideas on your particuler recipe.
I did this recipe, and in place of a “brick” shape for baking, made them into 1/2″ thick, 3×3″ squares. These were much easier to consume and have lasted over a year now.
Do you think you could add a little protein powder? Add a little more value to the bars.
I don’t see why not, but don’t know what all is in protein powder–as long as it has a decent shelf life on its own, I would think it would be fine to add.
I love this recipe. I have several variations that I’ve been trying. One has coconut, raisins, and sunflower seeds, with a little butter. This is more of an energy bar rather than a true “survival” food since it perishable.
I make them as described, without the jello, to keep as an emergency ration.
There are almost umlimited variations to this recipe, but the basics stay the same.
wondering about adding nuts or dried fruit to the recipe … would that work?
You could add them, it would just decrease the shelf life. Especially the nuts since they have oils that can go rancid. If you’re planning to eat them in the first 6-12 months, fruit or nuts would be a fine addition.
How long did you cook them for the small shapes? People who did little bars, or little squares, I’m looking to put my oven on 250 (its lowest setting) and just let them dry, but for how long? Thanks!
Would love to have an update on the taste of these after all the time you have had them.
I made mine 3 months ago (following the same mistake your friend did with the water). So far they are a yummy, crumbly mess.
I’m all for using a melon scoop to form balls. Takes less time to bake and can be stored in a zip-lock bag is not too moist.
can the powdered milk be replaced by protein powder? the ones guys often take after gym workouts?
I have never tried it, but you may be able to do that.
I would highly suggest not using RED. If you were to start vomiting for any reason you do not wan to confuse the red dye for blood, and vice versa.
Hi, that sounds like a great recipe but I was wondering if it would decrease the shelf life to add like flax seed, or hemp seed, ect.
Yes, the shelf life would decrease due to the oils in the seeds.
I have a question about wrapping them in the foil. What’s the long term effect of aluminium leeching into the bars? My concern would be the heavy metal absorption.
Wrapping them in foil is not necessary. If they are really dry, you can seal them with a vacuum sealer or in a mylar bag with an oxygen absorber for better “food grade” packaging.
What the heck it 3 tb of water?
Terry
3 Tablespoons of water.
I WAS going to feel bad about commenting on such an old post, until I saw the date on the last comment. LOL
ANYWHO; as far as dehydrating these- How long and at what temperature?! (I just got a dehydrator and want to add these to our food storage; it sounds like dehydrating would go smoother than the oven seeing as it is currently raining)
I will Have try making some of these and adding to my food storage.
Really want to get some of these made for the family. Would like to know if anyone has used a dehydrator to dry them, what temp, & how long?
Thanks!
Im getting ready to make these for my husband for Christmas (he is really into emergency preparedness). They will be from my kids. We will be smooching them into cookie cutter shapes (I thought that eating a santa shaped survival cookie will help keep spirits up if there is an emergency, which is very important), and adding a natural protein powder with a long shelf life. I was thinking of coconut oil in it to add some fat? I will be foodsaving afterwards. Ill let you know how it works out.
Cute Santa shapes. Ha ha. Just be aware that any oil added will shorten the shelf life significantly.
Hey I was just wondering is there a GF sub for the oats? I was thinking cooked rice or quinoa. maybe tapioca but wanted to know if anyone else made therir Gluten free.
The oats are mixed in dry, so is there a GF flaked cereal grain? A cooked grain wouldn’t substitute well.
I will try this recipe next time I run out of my homemade bars. I also add a lot of protein powder to mine plus every dried fruit I can find and well-drained pineapple tidbits.
I sometimes use coconut flour in place of the oat flour, but NO WHEAT ever. The family loves having these when they are on the run a lot.
With regards to adding fats. As noted oils do not store well.. HOWEVER other kinds of fats store very well. Rendered tallow from beef fat will store for a very long time, nearly indefinitely. Coconut oil is also known to have a VERY Long storage life.
The reason i mention this is that Ancient Indians used to make Pemmican with dried meats ground up with dried ground up berries and honey and mixed with equal weight in tallow and it lasted as long as they needed it to.
So when i make this im going to use tallow and a dehydrator. Lard will also store well, but Tallow and coconut oil will work just fine.
Can I assume (we know about word) lol That you can use any fruit flavor jello?????
Yes, you can use any flavor jello. The recipe has quite a bit of sugar, so the sweet jello flavors just turn out really sweet.