
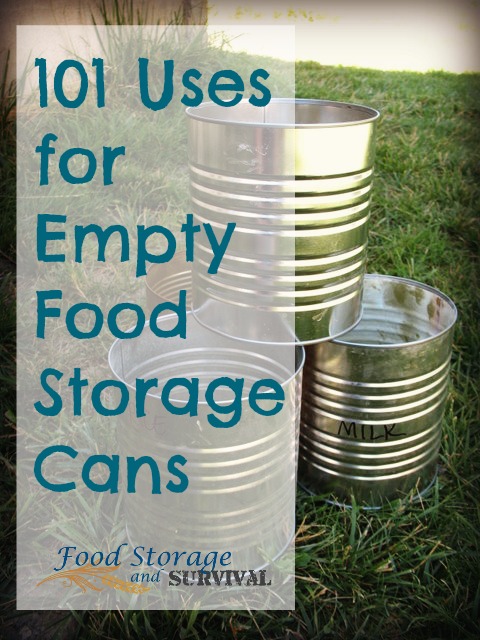
Do you have empty food storage cans laying around? If you’re like us, you use food that has been canned in #10 cans. These are the standard bulk food storage cans–approximately 6 1/8″ across and 7″ high. And once they’re opened, they can’t be resealed like a bucket can, so you end up with this:
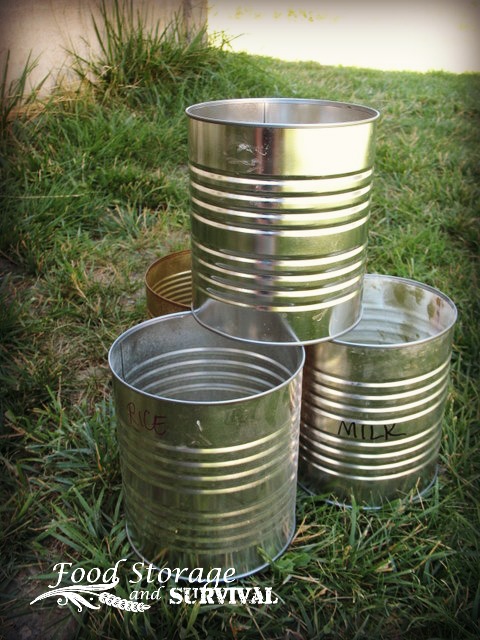
A bunch of empty #10 cans. It seems a shame to throw away such a sturdy little can, but what can you do with all those empty food storage cans? Well, today we’re going to give you a bunch of ideas–some from my sweet facebook followers, so if you recognize some of these ideas, you may have been the one to suggest it. ;) And a bunch in the comments section as well, so be sure to keep reading when you get to the end of the post!
And so, without further ado, here is the totally non-comprehensive list of things you can do with empty number 10 cans.
1. Store stuff in them in your garage/shop/shed/etc. They are handy in the shop for holding nuts and bolts and nails and washers and random odds and ends. Also good for catching oil and other nastiness and holding lacquer thinner etc. for cleaning parts.
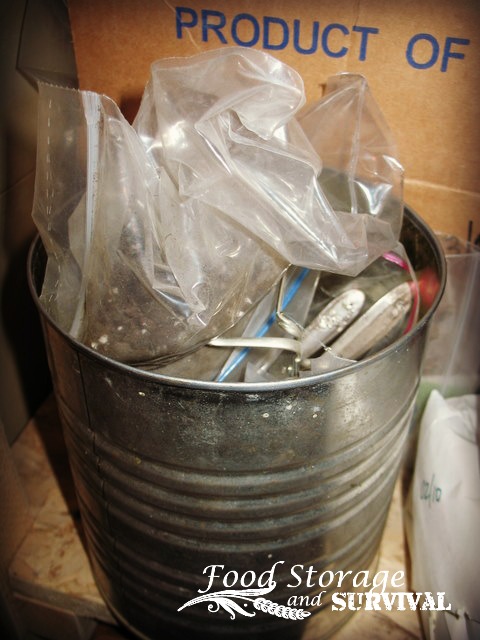
2. Store more stuff in them in your kitchen. They are handy in the house for storing kitchen foods like spices and mix packets. Also for holding a reasonable amount of foods that you may have stored in buckets in your food storage room and just need a little bit of in your kitchen. Like sugar or flour or oatmeal.

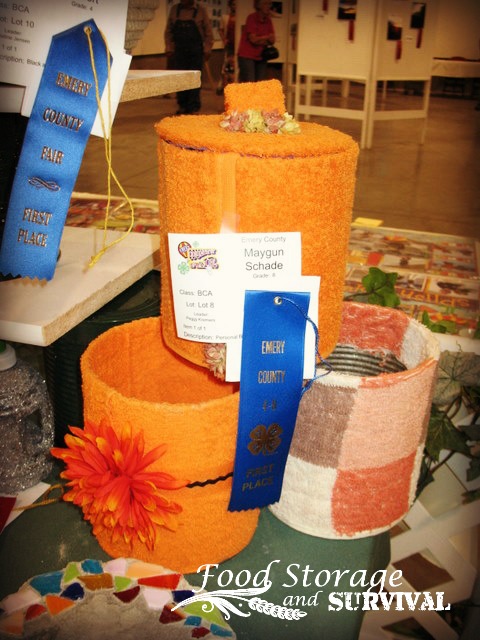
3. Store even more stuff in them in your house. There is more to the list than storing things in the cans, I promise! They’re just so useful for storing things I had to stretch it out over 3 numbers. Use them for art supplies like crayons and markers. Or decorate them up cute by hot glue-ing towels or fabric plus some trim/flowers/ribbon/etc. and use them as bathroom caddies for your cotton balls and whatnots. Additionally, if they’re really cute, they can be entered in your county fair exhibits and earn ribbons like these.
4. Use them for target practice. See, I told you there was more to this list than storing stuff! And if you’re real accurate, you can use the same can for #5.
5. Make some large Tin Can Luminaries. You don’t have to fill them with ice before punching the holes like the instructions say, but it does help the can hold its shape. Very cool for holidays like Halloween (out with the jack-o-lanterns) or Christmas.
6. Make some tin can stilts. Turn the empty can upside down and punch two holes opposite each other near what used to be the bottom. String a string (baling twine works great) through the holes and tie it so you’ve got something to hold on to. Like these only bigger. And you can paint them cute or just leave them silver. They work the same either way.

Or skip the string and just duct tape the cans to your shoes. Really?
7. Punch a couple of drain holes in the bottom and use them for container gardening. Again, you can paint them and make them look quite nice if you’re feeling crafty or just leave them.
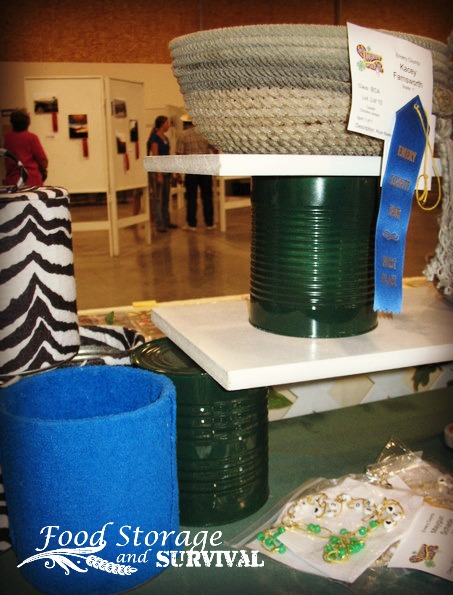
8. Use them with some boards to make shelves. Yep, these are painted cute–they are holding up the display shelves at our county fair. But you don’t have to get cute. We had a bookcase made with #10 cans and boards in our kitchen when I was growing up. I’m pretty sure those cans were full, though. (And check out the blue and zebra print bathroom caddies at the left in this picture as well.)
9. Cover the open top with tight fabric or leather secured with a rubber band (or just use the plastic lid that came with the can), add a couple of dowels with wooden beads on the ends and you have a drum. This could be decorated cute and used for a Christmas decoration or as a gift for a musically inclined child. Preferably one not living in your home. ;)
10. Make a “Mr. Potato Head” type guy with magnetic pieces. Cut face parts from craft foam or felt and attach sticky magnets (found in a roll in the craft section of the store) to the pieces. Store all the face parts in the can with the plastic lid on. We made one of these for a road trip when our kids were little. Lots of fun. We had face parts floating around the house stuck to anything metal for quite a few years after that. I’m pretty sure they’re all gone now, but it was a fun little diversion for them on the trip.
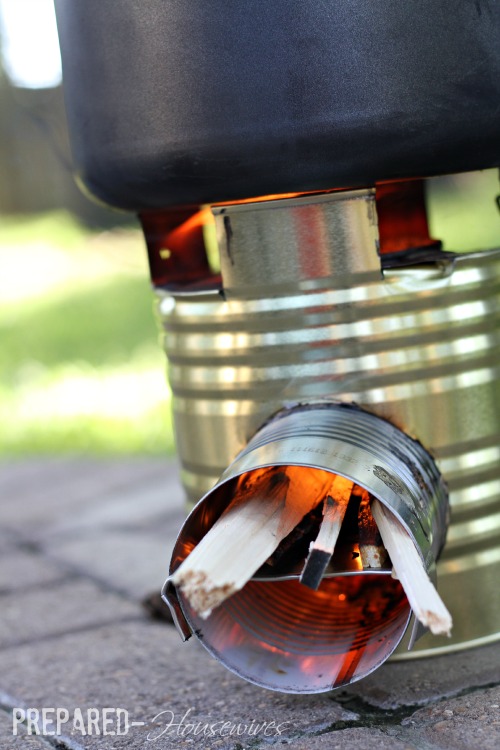
11. What? You guys aren’t feeling that crafty? Okay–Here’s a practical one: Save a couple soup cans to go with your #10 can and make a rocket stove. Get a few cans and make stoves with your friends or scout troop.
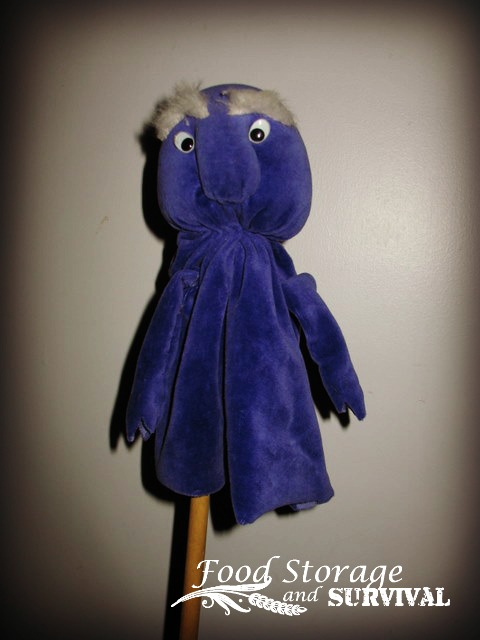
12. And another not so practical one. Make a puppet on a stick like this guy I made in a college puppetry class. His head is stuffed, but his body is just hanging fabric. Punch/drill a hole slightly larger than the diameter of your stick in the bottom of an empty can and he can pop in and out of the can. Hours of entertainment for little folks. This guy actually had a friend and they shared a can–they were the Two Monsters in a Can. I would demonstrate the two monsters in a can for you, however, since my kids have had access to the puppets for many years, the friend is no longer with us and their can went with him. Maybe I’ll make this guy a home of his own out of another can. I have plenty and he’s homeless . . . Kind of looks sad about the whole situation.
13. Use them for a feed scoop. We do plenty of chicken feeding with the empty cans around here.
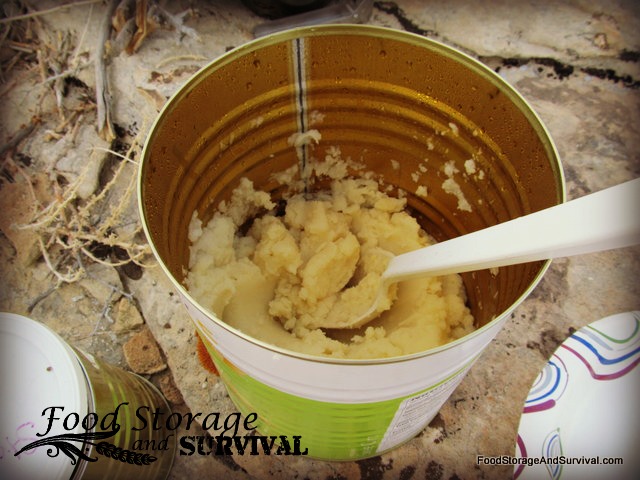
14. Use them for rehydrating just-add-water foods away from home. We used this one to mix up our potato flakes on a recent camping trip. Boil the water in another container, and just use the can for mixing and soaking. As a bonus, the can served as the container for all the dry foods we were using for that night’s dinner–super handy!
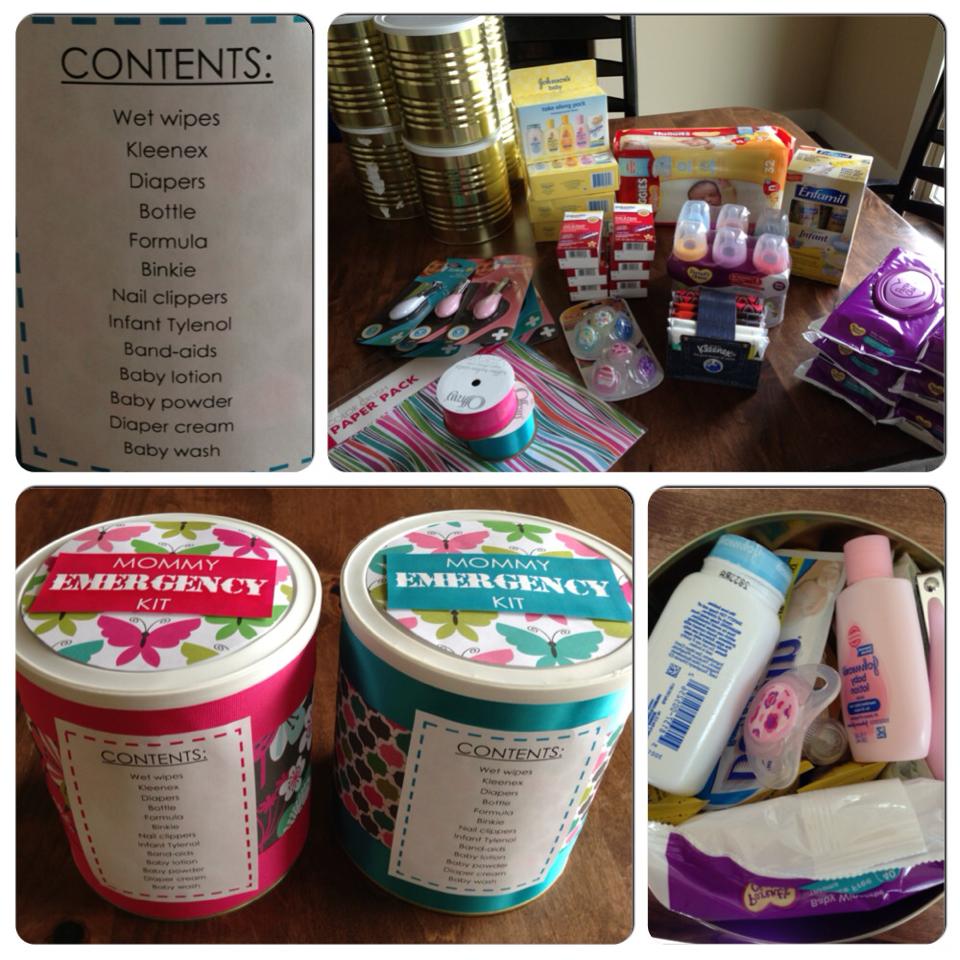
15. Use them as a container for a baby emergency kit. Perfect for a car trunk! The gals at Food Storage Made Easy put this one together. Great idea for a baby shower or Mother’s Day gift as well!
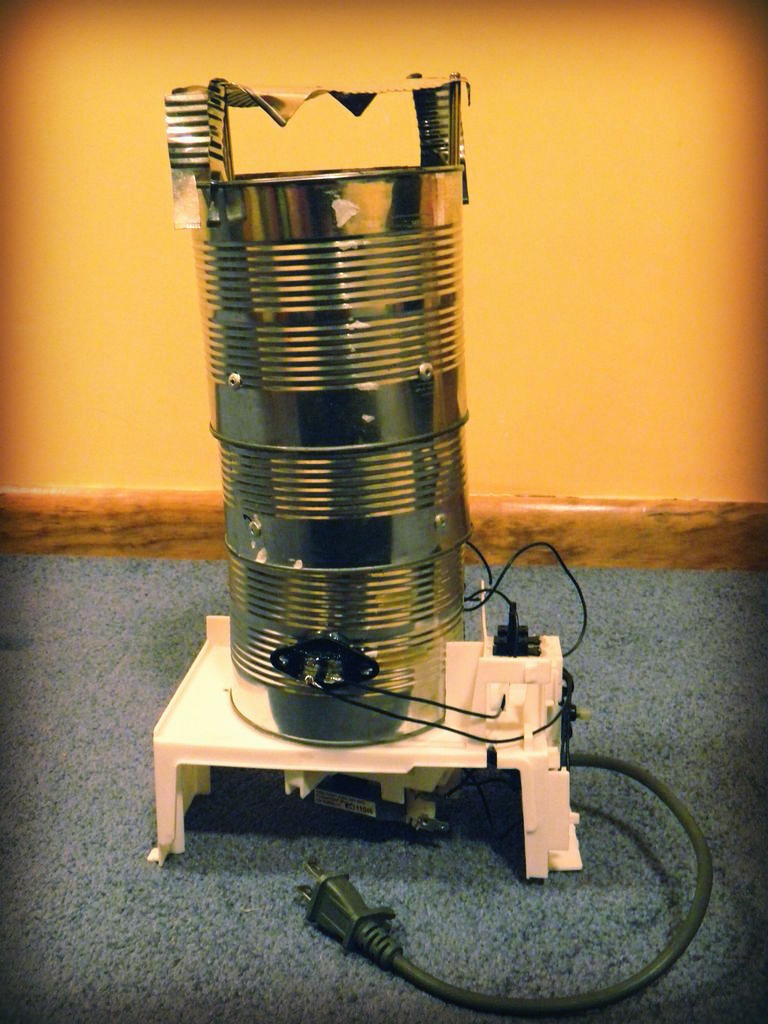
16. Make a food dehydrator. You’ll need a few more parts than just cans for this crazy contraption, but apparently it works!
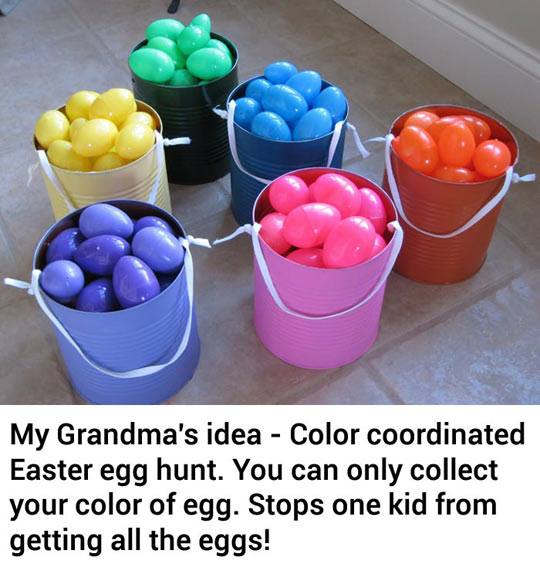
17. How cute is this idea? Use them for Easter baskets. (Found this one floating around facebook without a source–if anyone knows the source for this, please let me know and I’ll link to it!)
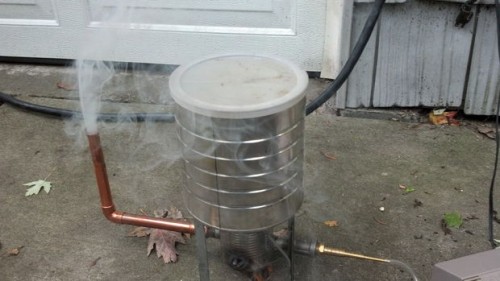
18. With just a few more parts you may already have you can build a cold smoke generator for smoking meat.
19. Store more stuff in them. I know you have more stuff. ;)
Okay, that wasn’t 101 ideas, but there are LOTS more in the comments! I bet together we can get to 101. How about you? What do you do with your empty food storage cans?
Keep preparing! Angela
***************************************************************
Subscribe to my email newsletter for updates and special deals.
Please be sure to follow Food Storage and Survival on Facebook which is updated every time there is a new article. You can also find me on Pinterest, and purchase my book, Food Storage for Self Sufficiency and Survival on Amazon.
***************************************************************
Shop the Thrive Monthly Specials or my favorites, the freeze dried vegetables and yogurt bites!
***************************************************************

Use them for ‘safe’ storage in my pantry – I label the lid with contents for other food stores, so valuables get labeled with food stuff too – things we don’t eat like lentils, dried black beans (I use canned), no one’s the wiser – till now of course.
Make a bucket – two holes punched near the top rim opposite each other, insert a wire handle from a coat hanger or leather thong, etc
A child’s seat – cover the lid with foam and material, cap the can, a seat
flower pots! 8-)
bathroom trashcans!! 8-)
Using large washers for bottom stability, screw thru the bottoms onto a 2×6 or thick plywood board. Nail board to the garage wall for sideways opening storage… Cleaning rags, towels, chamios cloths, gloves, mittens, hats, cans of spray paint, bottles of wine, small sacks of dog food, things in ziplock bags, paint brushes and rollers, sneakers, etc, anything you want up off the garage floor so that the dog or mice don’t get into them.
Roofing shingles… Cut bottom off. Cut open near seam. Pound flat. Use as roofing shingles on a shed.
Roof for a bird house :) Flatten as above, but then put a “V” into it for the birdhouse roof.
Cut bottom out and place deep into the ground around invasive plants like mints to keep them from spreading.
With bottom in them, turn upside down. Use as temporary heating units over small tender plants.
What a good idea
Great ideas!
When I was a young mother in the 70’s we took large cans, put one in the center and grouped others around it like petals on a daisy. We put them upside down, covered the solid “bottoms” with batting or foam, and covered the whole thing in fabric. They made very cute ottomans or children’s stools.
I did this in Girl Scouts! They made great campfire seats.
I especially love the luminaries since I love to entertain and just refuse to buy anything to hold candles. Enough of these in my yard would serve my purpose at night–mood lighting, not something to read by.I have lots of spray paint.
Great Ideas and I got a laugh out of the puppet …very creative and fun. Only thing we ever used them for was Scout Troop stoves. Love all the reader ideas too…thank you !!!
Love all these ideas! The tin can stilts (or romper stompers as I remember them being called) take me back to being a kid and playing with my friends, we’d make these to play with all the time. We could really get a lot of racket going in my parents driveway.
We’ve boiled water in a dozen or so at a time on the woodstove then set them on the ice off the front step. They leave an odd design in the ice but create traction without killing the lawn like salt does.
Similiar in style to your tin can stoves, I have used them to make ice cream on a Girl Scout camping trip. Ingrecients went inside a smaller can with a lid in the middle; rock salt and ice went in between the cans. We put a lis on and then we rolled them back and forth until the cream, sugar, and vanilla inside was ice cream!
I had to giggle at #3; we go through 4 cups of oatmeal in a morning, and we eat oatmeal 3-4 days a week at my house. I just buy 25 pound bags of oats and we keep them in a 6 gallon bucket with a gamma lid (the opened ones) that we get into every day. I have a few things in #10 cans, but my big stuff is in buckets.
I’d love to be added to your blogroll for food storage sites! We’ve been living on our food storage and garden for several years now.
When making freezer meals-especially liquid things like soup-the cans are perfect for standing up gallon-sized ziploc bags in to fill before freezing. No more spilled soup all over the counter!
really good idea!
Brilliant!
for measuring feed for the chickens, horses and dogs.
Just FYI, most of these cans have BPA in them…
Best to do good research before “going off the deep end” about BPA. Top Government Scientists Catch Media’s Favorite Anti BPA Researcher in Absurd Claims, Ties To Trial Lawyers. And here: ‘Majestically Scientific’ Federal Study On BPA Has Stunning Findings: So Why Is The Media Ignoring It?
RE: LORIE There always has to be a party pooper.
I bought a bunch of old rolls of wall paper borders and cut them into strips and glue them to the cans. Be sure to make the strips an inch longer so you can overlap the ends where they meet. I bought white plastic lids at L.D.S cannery that fit the #10 cans. The covered cans look great on the shelves in my craft/sewing room and hold oddles of supplies.
Angela and Everyone else,
Thanks for all the tips for using left over #10 cans. Y’all have some great ideas, and I’d like to share some that I know about.
To take marci357’s idea to the other end of the house. Me and my family were out west exploring old ghost towns, and we saw some folks that had used their old tin cans to cover knot holes that had fallen out to keep mice out of the house.
In Nuclear War Survival Skills, Mr. Kearny describes a method of making an Improvised Grain Mill out of three pieces of metal pipe and a #10 can resting on a piece of concrete.
Link:
Oregon Institute of Science and Medicine – Nuclear War Survival Skills, Chapter 9: Food
Expedient Processing of Grains and Soybeans
http://www.oism.org/nwss/s73p920.htm
Scouts and their parents will know about using a tin can with a plastic lid for holding the toilet paper out by the out house ; – )
I keep an empty food storage can with a plastic lid in our car kits. The can holds eight votive candles with some matches. Place a candle in the can and light with the matches. A single candle will provide some heat and light. Plus, the candle lights up your position, so your rescuers might be able to see you at night. Needless to say, make sure you practice fire safety with a lighted candle.
Thanks again!
Great article. I don’t have near the imagination it takes to do things like this. Glad you are around!
I’ve always used cans as biscuit and cookie cutters. Just cut out both ends.
I use the lids- two ways- first with a regular can opener- clean carefully- and tape with painter’s tape or masking tape. That way when you store prepared mixes, the top is sealed with the can top and the plastic lid. It also keeps the granola together in the can with this movable lid. The second is with the side can opener- it pops the lid seal apart from the can. We have placed it on top and used that versatile duct tape.
We have used the cans for portable stoves, for a sand/salt containers for our cars. They are used at camp for portable water containers for fire prevention- adding a tiny bit of vegetable oil for bug control.
If you use mylar bags for storage- open both ends of a #10 can and use it as a funnel for the mylar bag… fits great!
Just for a start…
Some Good Ideas Will use Some of those.
We put them around seedlings in a fence line (climber beans, peas, etc.) so we can still run a weedeater down the fence line to control weeds without hurting our plants.
I have a few in the garage with the bottom screwed to the wall and one is used as a hose reel for the welder wires, the other to store tools for the welder.
all great ideas – thanks
loads of GR8 ideas~! thanks~!
and I wanted to add the tin can tin man I first saw at a fund raiser auction an they sold for 75$ each~!
soo cute… this one I found via google, is a bit different but still cute~!
the ones I saw at the auction were all connected with wire so they were movable an hung from the top of the funnel~ anywayz..enjoy~!
http://www.thriftyfun.com/tf43267298.tip.html
OH~
(they had a little red heart painted on the front too….
Those are super cute!
As children, my siblings and I took as many as we could find and stacked them into a pyramid shape. We then filled them all with water. They make great “castle” walls. It aways involved the wall getting knocked down and everyone getting wet. It made a great summertime activity.
I have an understanding that if you open the cans with a large commercial can opener it will cut it from the side and reinstall the lip so that it can be used again…. This is the kind that u c in commercial kitchens that r bolted to the counter and you have to pick it up to put the can under it and turn the crank…. I am still trying to verify this but if you look at pictures on some websites it sure looks like it does it to me…
If you use the side cutting can opener that takes the entire top off, you can re-seal the cans with new lids, but you need a sealer.
Most of those bolted down, post and crank style, commercial can openers are the regular blade type. There are commercial can openers that remove the entire lid, but they are very expensive and most commercial kitchens can’t justify that expense. If you get cans from restaurants or institutions, you will need the plastic lids if you plan to store anything in them.
Pampered Chef has a Safety Can Opener that opens without cutting the can. . . it breaks the seal. From my understanding, you can “pop” the original lid back onto it, like if you’re going to put it back in the refrigerator. Probably not a perfect seal, but kinda sealed, nonetheless :D
I remember putting three big cans together and making umbrella holders as a campfire girl
put a vertical cut down the side, put in a roll of toilet paper and thread it thru the opening. Put the top on and poke a hole in the center of both ends and thread a piece of cord thru it. there you have a toilet paper holder.
I’m going to build an herb tower with my cans.
Here’s another adorable crafty thing–Snowman hat decoration: http://www.allreddesign.net/2012/10/snowman-holiday-hat-tutorial.html
My husband and I have both recalled nightmarish traffic incidents when we were stuck in our vehicles for up to 7 hours at a time due to a bad highway accident with no food, water, or bathrooms. I’ve made emergency car kits from #10 cans that hold water or juice pouches, food bars, hard candy, glo-light sticks, handwarmers, emergency blanket, rain poncho, wet wipes, and small packets of tissues. Most items can be found at a dollar store and all fit inside the can. Most importantly, all items can all be removed from the can and when needed, the can may be used as an emergency toilet (that is what the tissues are for). Tie an orange bandana (dollar stores have these, too!) around the outside of the can to find it easily in the trunk and it can be used to signal distress by hanging it out of a rolled up car window if the vehicle needs to be left on the side of the road. Each of our teenaged children have been given one to keep in their vehicles, too.
I have found large cans useful for baking- crockpot or oven- especially nice for Multics grain and fruit breads.
I used the #10 cans to make “gift” cans for a church sale several years ago. Punch or drill a small hole on each side of the can, spray paint, paint or glue any design, then make a handle out of stiff wire and thread through the two holes for a handle. Stuff with tissue paper and small item gifts. Can be saved or reused over and over.
Lizard traps. Bury them so the top is ground level. Lizards can’t climb out and get trapped. Some bugs too. (it’s a boy thing)
keep it the kitchen with a lid for peeling to put in your compost
I love using #10 cans to bake bread in, it makes beautiful round loaves. I love giving these lovely loaves as Christmas gifts. I do however make sure that they are not the lined cans as often found with green beans and tomato products, I believe these are the ones that are contain bpa.
I always use around my tomato and pepper plants, also put around lilac sprouts, helps to keep the water so you don’t have to water everyday, also protects young plants from wind and storms.
Use them to cool down the rabbits. Fill with water and place in rabbit cages 2 or 3 in a row. The evaporation cools the cans and the rabbits will lay up against them. They can be frozen too for some extra cooling.
You forgot rocket stove, propane can forge, and wifi waveguide antenna. Those “can” be practical too.
She did too link to a rocket stove!
Last year for Christmas my 4 year old and I decorated one for her little sister to hold hair stuff, head bands fit wonderfully on the outside and the rest goes in
Thanks for sharing my rocket stove with others! That’s one of my favorite uses for a #10 can!
Also, I think #10 cans are fun to re-use and make time capsules to bury in the backyard!
I’ve turned them into “mailboxes” for the girls at Girls Camp. They got to paint their own.
With some plaster of paris around a pipe to serve as a hole it can be a flag stand for Cub Scouts.
I glued green snouts and eyes on them to use as the target for Angry Bird bowling.
We keep the oil for the swamp cooler in one, so it doesn’t get mess everywhere.
My older brother used to use tin snips and turn them into shackles. (Don’t ask)
Keep on the back porch for someone’s “special” rock collection.
Use as the “basket” for any other type of gift. Make it pretty, unless you want to fill it with tools or barbeque stuff.
Line them up for a bean bag toss game. Paint them different colors and set them at different distances.
Fill with first aid items for a kit for the car.
Keep on the back of your dryer to stuff with dryer lint to use as fire-starter.
Turned upside down they are little seats for little people outside.
Turn sideways to for putting practice.
I’ve got my food storage matches stored in one.
We use the plastic lids to sit under the toilet plunger in the bathroom. When it gets gross, we toss it and replace with a new one.
Cut a slit in the lid and you have a nice noisy piggy bank.
Just the right size for storing a roll of toilet paper for camping- keeps it clean and dry.
With a roll of toilet paper and some rubbing alcohol you can turn it into a make-shift stove- look online for instructions.
My #10 cans have a lid. I use them to store dried tea grains until I get enough to use on my garden.
I really like this idea for my sewing room. Thank you.
you could also use contact paper, so you don’t have to glue or tape ;)
We take four empty cans with us camping. Once at campsite the kids, fill the cans with rock , sand, and or dirty than I put in the little solar lights that have the stick on them. Let them stand in sun, at night we place one near the tent, one near the car, and one near the table for the early morning coffee maker. The other one goes near the path to the bathroom. We also have used the same cans filled with same stuff and weights to hold down the end of tarps, the wind doesn’t move them.
Some how I hit the enter button, sorry. I forgot to tell you that each child fills that very same can that we used for light at campsite to bring home any thing they found, ( special rocks, even a few dead snails have came home, any little things they bought or seem special to them. So we use cans a lot for different reason and wouldn’t leave home without them.
These are great! Thanks for sharing!
I reuse by placing mylar bags in the can, filling the bag with beans rice etc, O2 obsorber and seal the bag. Place the lid back on.This protects the bag and is easy to store back with other food cans. Buying bulk food is more cost effective(cheaper) and this extends the life of food and is added protection.
hi, great ideas. I never throw these out.
I don’t like a sloppy old hole with raggedy edges – when I dig a fence post hole which is of course a lot wider I neaten up the edges with the shovel, so – I just used 4 #10 cans a couple of weeks ago for cement forms for 4 legs of a small roof support. It would have taken a lot more concrete with a sloppy raggedy hole.
A house I bought some years ago had been lived in by a contractor and every time he had a bit of leftover concrete on a job he’d fill either a #10 can or metal coffee can. The chunks of concrete were lying around the yard and field and I used them for so many things through the years!
In the garage I keep my larger nails and bolts in them on a shelf.
I filled a dozen with water, froze in freezer, then punched a pattern with nail & hammer, thawed water, spray-painted and had 12 cool candle holders for my daughter’s graduation party.
I have one in my chicken’s feed bin that I altered to make it easier to grab. OK, it happened on accident but it still counts! The can was sitting on the concrete garage floor and a 2×4 fell and put a 2″ dent on the top edge. I makes it SO MUCH easier to grab now! When I misplace it I holler “where’s my special can?”
Just found this site and am really enjoying it – some great ideas, thank you!
One thing I’ve used one of these for (other than storage) was as a double boiler maker. I wanted to use a bowl for the ingredients rather than a narrower tin, so I removed the ends of the tin, marked around it about 1/3 of the way high and cut it using tin snips (be careful when doing this!). Then put it on the bottom of the pan, placing the bowl on top of it as the double boiler. Worked well.
I’ve also made an ’emergency’ oil diffuser out of one; punched holes in the side for ventilation, stuck a tea light in the bottom and placed a bowl with hot water and essential oil in it on top. Not as pretty as most commercial diffusers, but definitely effective.
I didn’t read all the comments so don’t know if anyone touched on this. We had a child who would get carsick on trips. A #10 can with a Ziploc bag inside (top of bag pulled over edges of can holds it securely) worked great. We called it our barf-bucket and if she got sick, it was easy enough to zip up the bag and put another one in. Saved us on many a trip! easy to carry in the car and holds the gallon size Ziploc backs as well.
Oh, this is a great idea! I had a nephew with this same problem–this would have helped them a ton!
Good idea my son wiped out plants last year…..I will remember this one….thanks
Make a pail and Use for Fire Ashes until they cool copleately
Do you have a link to the cold smoker building instructions? I’d like to try that.
I sometimes use cans for storing vacuum sealed bags after I have re-portioned the contents to more usable sizes, Pack for using on short camping trips.
You just had to click the bold part of her post. Here’s the link, and by the way, “Miss Betsy” said in the comments that you don’t have to use a #10 can, a coffee can will work too. Good luck!
http://www.instructables.com/id/Miss-Betsys-Cold-Smoke-Generator/
From my early Years my Grandmother saved them and would get tired of our boredom. She would pull a #10 can for each of us, put 2 holes opposite of each other at the top of the can and add twine for a strap. (This freed up both hands) The lid was on the bottom so we wouldn’t lose anything while running, and we could lid them in, on our big adventures. She would tell us to go pick blackberries, or whatever else was in season on the farm, and don’t come back until it’s full. We weren’t bored anymore. I have 2 that I keep around these days for berry picking, and although not the same ones it is the same kind that brings back wonderful memories of being with my Grandmother on the farm.
What wonderful ideas! Thank you all! I’ve used mine for several things over the years.
You can melt candle wax in a can. Put the can in a larger pan of water and simmer. Once the wax is melted you can pour or ladle it out of the can. Unused wax can remain in the can for storage.
Punch large holes along the bottom edge, cut off the bottom, and add a stiff wire handle to the top. Use it to start coals in your BBQ grill or start kindling in your fire ring. Once you have a good burn, grab the handle with a stick and pull the can off the coals.
Use for sorting & storing garden seeds. Put root vegies in one, legumes in another, greens, flowers… Your seed packets will stay dry and don’t blow away when working in the garden.
They are also great for mixing up messy stuff like small batches of cement patch or as paint pails. Don’t store paint in them, just use them to hold the paint you are planning to use. This keeps your brush from contaminating the original can of paint.
My mother always used to have a can of bacon drippings in a can in the refrigerator. She used the drippings for greasing her bread/bun pans to give that smokey bacon flavour.
We also used cans to make noise makers for soccer and basketball games. Put some rocks or marbles in the can and put a lid back on and shake and cheer!
I made emergency candles in a tuna (or cat food) can with corrugated cardboard & paraffin then set one inside of a no. 10 can that had a couple holes punched at the bottom of the side. They’re big enough to set a pot on to heat water or soup when the power is out.
I use one can for crushing all my egg shells to use in my gardens to keep slugs away. and the other one I use to keep all my coffee grounds in for around my plants.
What a great pin! I grew up in Northern California, and there were an abundance of blackberries and huckleberries, we used to use a can opener to punch holes in the side of the can around the lid opening then we’d wrap the metal tab around and around to make a hole! We’d do this one on each side of a can. We’d tied it with some clothes line rope or a light weight rope and hang the bucket around our neck keeping both hands free for berry picking. About one full bucket was a pie! Yum! My sisters and I used to take turns making blackberry and huckleberry pies for desert! It worked great! The bucket around the neck this is a choking hazard if you fall and it catches on something as you go down, but for the most part we were upset at the lost berries, not the ring around our neck! Putting the rope under your collar of your shirt really helped relieve and rope burns or rashes. The collar helps with keeping your neck from getting sunburned! It also works great as a clothes pin bucket on the clothes line, but it will hold rain or snow when left out. We eventually went to a mesh bag for clothes pin storage!
Couldn’t it be used for a faraday (spelling) cage? Put in contents and seal with a cut to fit top of sheet metal?
I’m surprised no one has mentioned this in the years since this was posted. Passive heat! It takes a bit of skill and a few bucks to build but they can be used to collect heat from the sun similar to how solar panels use the sun to generate electricity. Basically, you glue a number of cans together (make sure to cut the bottom off to make a tube of cans), paint them black, and enclose them in a custom built box to whatever dimensions you need (paint the inside of the box black as well), and use a solar powered fan to push the warm air into your home through an insulated hose/tube. There’s more to this but it might be better to look up a few videos on how they’re built, my terminology isn’t technical enough to describe all the steps and having a visual is a much better representation of what I’m trying to describe.
How awesome! This would be great in the winter if “the grid goes down!” Thank you!
If you ever saw military folks with EXTREMELY pressed field hats, this is how they made them. Soak the hat in heavily-starched water, then stretch over the can to dry. Can even iron it later while still on the can. SHARP!
Cut out both ends and use it as a charcoal starter. You’ll need some pliers, but it’s about 20 bucks cheaper than the big-box store ones.
Keep toilet bowl brush (or any other disgustingly filthy implement) in it.
Use to transfer ashes/coals after a fire or BBQ.
Use to soak paint brushes after use.
Paint black and set upside down over weeds in your sidewalk/driveway. The heat will kill the plant without putting down herbicides.
Cut both ends and place over seedling plants until they are big enough for animals/birds to pull them up. Have also read about cutting all but about a 1/4 inch of bottom so that you can set these over plants in hail-prone areas. Prop the lid up towards the West, and when the storm comes, the hail will knock the lid down to protect the plants.
Use as a pot when making your own fire-starters (sawdust + paraphin wax) so you don’t damage any of your cookware.
Use as an intermedary container when mixing paint to a specific color.
Cut off both ends…cut length wise…then place around base of young trees/saplings so you don’t damage them when weed-eating around them.
Place over trailer hitch to keep rain off and prevent rusting.
In our RV, we use them to capture first 30-seconds of “not warm” water…then utilize that water for flushing the toilet later on.
Fill several cans with different levels of water and make music by tapping on the rims/sides.
Are we at 100 yet?
Wes, these are awesome!! The hail protection for plants is brilliant! You should post a picture.
I didn’t understand the military men’s field hats though, haha!
I keep an empty can with its plastic lid on a stand on my back porch along with a roll of pick a size paper towels. When I take my little dog Spirit out I grab a half sheet of towel and pick up his do-do. I drop it into the can and when it is garbage day I just drop it into the garbage can and set out a new can! Keeps me from accidentally stepping in it because it does not sit on the ground and keeps it from being tracked into the house. Not the most glamorous use, but I think it is one of the most useful!
I lay one on its side and stab an X-shaped hole in it with a large knife, with the points of the X inside the can. A candle pushed up into the hole will be held by the points. A handle of some kind, even string, on the other side of the can will help produce a lantern. The candle light reflects off the shiny bottom of the can and not shine into your eyes. When it’s dark outside this gives enough light to follow the path to the chicken house or to wander up the driveway to the road.
Mervin, could you post a picture of this? Is the candle on the inside of the can? Does the handle go across the top or bottom of the can? Sorry, I can’t picture this, but it soulnds like a great idea!
There is an amazing product called “That Seals It!” (no joke) and you can use it to vacuum seal opened number 10 cans. You can use it with a food sealer or a manual pump so it’s off grid. It’s perfect for dehydrated things, produce, or brown sugar. Mine never dries out! You can buy them on amazon or through Thrive. I’ll try to post the website below.
https://www.amazon.com/dp/B07SHXV2M6
Emergency toilet..